
이 글은 Java의 기초적인 원리를 간단하게 정리한 글입니다.
hyperskill 의 글을 주로 참고하여 작성하였습니다.
함수형 프로그래밍 등의 개별 토픽에 대해서는 따로 작성할 계획입니다.
Type Casting
- Implicit casting
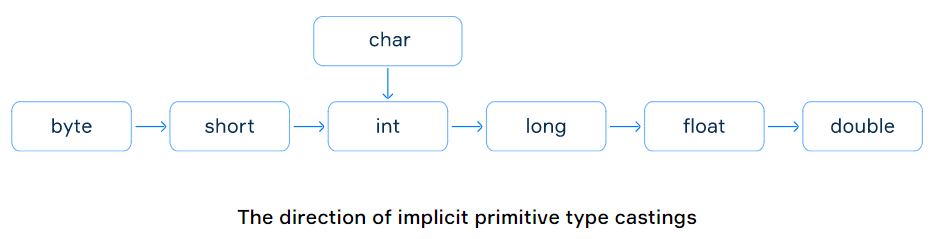
Implicit casting은 Explicit하게 type casitng을 명시하지 않아도 자동으로 type casting이 되는 경우를 의미한다.
저런 관계는, 각각의 data-type이 표현하는 값의 범위에 의해 지정되는데, 넓은 범위를 표현하는 타입으로 변환될 때 Implicit 하게 casting 할 수 있다.
int num = 100;
long bigNum = num; // 100L

short shortNum = 100;
int num = shortNum; // 100

char ch = '?';
int code = ch; // 63
예를 들어, int에서 long으로 타입 변환을 할 때 굳이 변환되는 타입을 명시하지 않고 할당하면 바로 type casting이 된다. 이러한 작업은 컴파일러가 수행해준다. char보다 int의 값의 범위가 넓으므로, char에서 int로 type casting 을 할 땐 명시하지 않아도 된다.
- Explicit Casting
넓은 범위를 포함하는 타입에서, 더 좁은 범위를 표현하는 타입으로 형변환을 할 때, 명시적인 type casting이 필요하다.
// requires explicit casting because long is wider than int
int i = (int) l; // 2

// requires explicit casting because the result is long (indicated by L)
int val = (int) (3 + 2L); // 5

// casting from a long literal to char
char ch = (char) 55L; // '7'
Primitive and Reference Type
primitive type은 변수가 가리키는 메모리에 실제 값이 들어가 있다. 그 반면, Reference type은 값이 존재하는 메모리의 주소가 담겨있다.
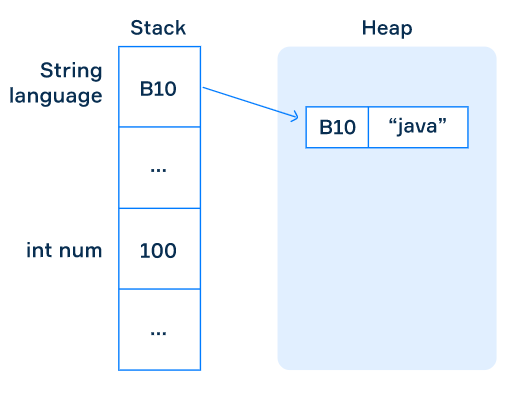
Reference Type의 대표적인 것으론 String이 있다. String이 생성될 때 값은 Heap에 존재하게 되고, 변수영역엔 그 Heap의 주소값이 들어가게 된다.
메모리가 저런 상황에서 다음과 같은 코드가 실행되었다고 해보자.
int a = 100;
int b = a;

String language = new String("java");
String java = language;
이때 실제로 메모리는 밑의 상태가 될 것이다.
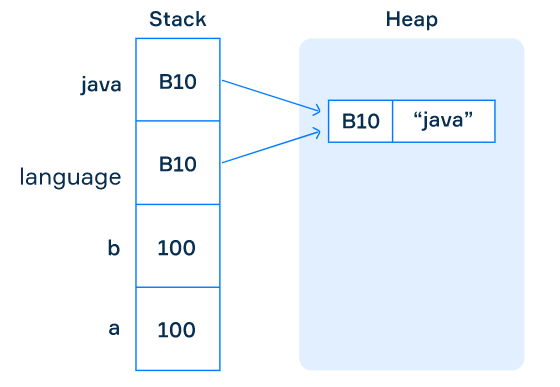
결국 둘 다 변수가 가리키는 메모리에 존재하는 값이 그대로 Copy 된다. 실제 Heap 영역의 메모리가 duplicate 되지는 않고, 참조하는 포인터만 하나 더 생긴 것이다.
Reference Type를 == 연산자로 Comparison하면, 결국 실제 가리키는 값이 아니라 가리키는 메모리의 주소가 같은지를 비교하게 될 것이다. 그렇기 때문에, 실제로는 Reference type에 equals라는 내장 메소드가 있어, 이를 이용하여 값을 비교하도록 하는 것이 맞다.
String s1 = new String("java");
String s2 = new String("java");
String s3 = s2;

System.out.println(s1.equals(s2)); // true
System.out.println(s2.equals(s3)); // true
Final variable
값이 변경되면 안되는 변수를 지정하기 위해서 final 키워드를 이용하여 변수에 값을 할당한다.
선언 후 처음 값이 할당된 이후에 값을 변경하면 오류가 터진다.
final boolean FALSE;
System.out.println(FALSE); // error line
(위 경우는 할당조차도 안한 케이스)
Reference type의 final 인 경우
해당 타입에 존재하는 메소들을 이용해서 변수가 가르키는 메모리에 있는 값을 변경할 수 있다.
당연하다. 변수 자체가 가지고 있는 값을 바꾼게 아니기 때문이다.
final StringBuilder builder = new StringBuilder(); // ""
builder.append("Hello!"); // it works
System.out.println(builder.toString()); // Hello!
지정된 값을 꼭 변경하면 안되는 상황이라면, final keyword를 유용하게 사용해보자.
Scanner
standard input 은 프로그램에 입력되는 데이터 스트림이다. standard input을 받는 가장 단순한 방법은 Scanner를 통해 입력을 받는 것이다. 입력을 받는 동안 프로그램이 실행되지 않으며, 선언된 scanner의 nextLine 만큼의 입력을 받게 된다.
scanner.nextInt , scanner.next.. 뒤에 여러 타입으로 scanner를 통해서 들어오는 값을 특정 타입으로 바인드 해줄 수 있다. 혹은 scanner.next를 통해 그냥 받아도 된다. scanner.nextLine을 통해 말 그대로 다음 줄까지 입력을 받게 된다.
import java.util.Scanner;

class Main {
    public static void main(String[] args) {
        Scanner sc = new Scanner(System.in);
        while (sc.hasNext()) {
            System.out.println(sc.next());
        }
    }
}
다음은 입력이 끝날 떄 까지 받을 수 있는 코드이다. hasNext 메소드를 이용하여 next의 유무를 판단, 없을 시 while문이 중단되어 프로그램이 종료된다.
int 배열 입력받기
입력으로 숫자가 띄엄띄엄 입력되는 경우라면, 다음과 같이 배열을 선언해주고 for loop을 돌아 입력을 받는다.
int[] data = new int[size];

for(int i = 0 ; i < size; i++){
	data[i] = scanner.nextInt();
}
String
Java에서 String은 Immutable type이다. 한번 선언된 String 자체의 값은 변경할 수 없고, 새로운 메소드를 통해 해당 String을 통해 변경된 값을 생산해야 한다.
String의 char를 하나씩 Iterate 하고 싶은 경우,
String str = "strings are not primitive types!";

int count = 0;
for (char ch : str.toCharArray()) {
    if (Character.isWhitespace(ch)) {
        count++;
    }
}

System.out.println(count); // 4
Char[] -> String
Char array로부터 String을 만들고 싶으면 이렇게 하자.
char[] chars = { 'A', 'B', 'C', 'D', 'E', 'F' };

String stringFromChars = String.valueOf(chars); // "ABCDEF"
String.valueOf의 인자로 char의 배열을 전달하면 String을 생성할 수 있다.
String -> Char[]
String으로부터 CharArray를 만들고 싶으면, toCharArray 메소드를 사용하자.
char[] charsFromString = stringFromChars.toCharArray(); // { 'A', 'B', 'C', 'D', 'E', 'F' }

String theSameString = new String(charsFromString); // "ABCDEF"
Split
String을 단어 하나하나 단위로 쪼개고 싶으면, split 메소드를 사용하자.
String text = "Hello";
String[] parts = text.split(""); // {"H", "e", "l", "l", "o"}

String sentence = "a long text";
String[] words = sentence.split(" "); // {"a", "long", "text"}

String number = "+1-213-345-6789";
String[] parts = number.split("-"); // {"+1", "213", "345", "6789"}
split 메소드의 인자로 분리하는 기준을 넣어주면, 해당 문자열로 분리한 결과를 배열로 반환하는데, 각각의 element는 String 타입으로 지정된다.
Mutable String - StringBuilder
그냥 String은 Immutable인 반면, StringBuilder는 내장 메소드들을 이용하여 String을 조작할 수 있다.
String의 메소드들을 기본으로 지원하고, 다음과 같은 메소드들을 지원한다.
setCharAt - String 내 특정 index의 char를 변경함.
StringBuilder sb = new StringBuilder("start");
sb.setCharAt(1, 'm');
System.out.println(sb); // "smart"
deleteCharAt - String 내 특정 index의 char를 제거함.
StringBuilder sb = new StringBuilder("dessert");
sb.deleteCharAt(2);
System.out.println(sb); // "desert"
append - String 에 String을 이어붙임
StringBuilder sb = new StringBuilder("abc");
sb.append("123");
System.out.println(sb); // "abc123"
insert - String의 특정 index에 String을 끼워넣음
StringBuilder sb = new StringBuilder("I'm a programmer.");
sb.insert(6, "Java ");
System.out.println(sb); // I'm a Java programmer.
replace - 특정 index 범위의 값을 입력된 값으로 교체함
StringBuilder sb = new StringBuilder("Let's use C#");
sb.replace(10,12,"Java");
System.out.println(sb); // Let's use Java
delete - 특정 영역의 char를 제거함
StringBuilder sb = new StringBuilder("Welcome");
sb.delete(0,3);
System.out.println(sb); // "come"
Reverse - string의 순서를 뒤집음.
StringBuilder sb = new StringBuilder("2 * 3 + 8 * 4");
sb.reverse();
System.out.println(sb); // "4 * 8 + 3 * 2"
capacity - StringBuilder에 할당되어있는 메모리의 크기를 알려줌.
StringBuilder는 실제 String의 크기보다 메모리를 크거나 같은 사이즈로 잡고 있다. 그러다 입력이 해당 메모리보다 커지게 되면, 새로운 메모리를 자동으로 할당해서 Capacity를 조정한다.
StringBuilder sb = new StringBuilder(); // initial capacity is 16

System.out.println(sb.length());   // 0
System.out.println(sb.capacity()); // 16

sb.append("A very long string");

System.out.println(sb.length());   // 18
System.out.println(sb.capacity()); // 34
Method Overloading
- 같은 이름의 함수여도, 입력 되는 parameter의 갯수와 타입에 따라 다르다. 이런 것을 메소드가 Overloaded 되었다고 한다. 같은 이름의 메소드도 서로 다른 argument를 전달함으로써 서로 다른 메소드를 동작시킬 수 있다는 것이다.
public static int abs(int a) { return (a < 0) ? -a : a; }

public static float abs(float a) { return (a <= 0.0F) ? 0.0F - a : a; }
위의 메소드를 보면, 함수명은 같지만 입력 타입과 리턴 타입이 다르다.
Implicit Casting in Method Overloading
public class OverloadingExample {

    public static void print(short a) {
        System.out.println("short arg: " + a);
    }

    public static void print(int a) {
        System.out.println("int arg: " + a);
    }

    public static void print(long a) {
        System.out.println("long arg: " + a);
    }

    public static void print(double a) {
        System.out.println("double arg: " + a);
    }

    public static void main(String[] args) {
        print(100);
    }
}
여기 동일한 이름의 함수에 입력 타입들만 다른 함수들이 있다.
만약 print(100)을 하면, 100은 int니까 2번쨰 함수가 실행 될 것이다.
int인 함수가 없다고 하면, implicit type casting을 통해
가장 가까운 long을 인자로 인식하고 print(long a)가 실행될 것이다.
또 그게 없다면.. double이 실행 될 것이다.
만약 double이 없다면 프로그램은 컴파일되지 않는다. Capacity가 작아지는건 explicit casting이 필요하기 때문이다.
Call Stack
모든 자바 프로그램은 메소드들로 구성되어있고, 어떤 메소드가 어떤 메소드 다음에 실행되는지를 파악하기 위해 JVM은 Call Stack이라는 자료 구조를 이용한다. (Execution Stack 이라고도 부른다)
일반적인 스택과 같이 LIFO 구조를 가진다.
public class Main {
    public static void main(String[] args) {
        int n = 99;
        printNextEvenNumber(99);
    }

    public static void printNextEvenNumber(int n) {
        int next = isEven(n) ? n + 2 : n + 1;
        System.out.println(next);
    }

    public static boolean isEven(int n) {
        return n % 2 == 0;
    }
}
위에 작성된 Main class를 기초로 설명하면 다음과 같다. 처음 실행되는 함수는 main 함수이고, stack에 main 함수에 대한 stack frame이 추가된다. stack frame은 해당 메소드의 이름, 메소드에 전달된 입력 변수, 메소드 내에 선언된 변수가 저장된다.

main 함수 내에서 printNextEvenNumber 메소드가 실행되면, 해당 메소드에 대한 새로운 Stack Frame이 Call Stack에 push 된다. 함수명 printNextEvenNumber, 입력 변수인 n과 지역 변수인 next가 해당 Stack Frame에 추가된다.

그 후 isEven이란 함수가 실행되고, printNextEvenNumber 위에 입력 인자 n과, 그 위에 isEven 이란 이름으로 StackFrame이 형성되어 올라갈 것이다. 해당 함수의 실행이 완료되면, 해당 StackFrame이 제거되고 다음 함수가 마저 실행된다.
Call Stack에 모든 StackFrame이 제거되면 프로그램이 종료된다.
StackOverFlow는 저 Stack Frame이 너무 많아져 메모리를 더이상 할당할 수 없을 경우에 발생한다.
일반적으로 부적절한 recursion 에 의해 발생한다.
What are streams
프로그램이 disk, file, network location 등을 다룰 때, stream이라는 abstraction을 이용한다.
실제 물이 Source에서 destination으로 흐르는 것을 비유하여 stream이라고 이름이 붙여졌다.
서로 다른 source로부터 데이터를 전송하고 받는데 stream을 사용한다.
IO stream은 두가지 영역으로 분류된다.
- input stream : 소스로부터 데이터를 읽는다. (read)
- output stream : 특정 영역에 데이터를 작성한다. (write)
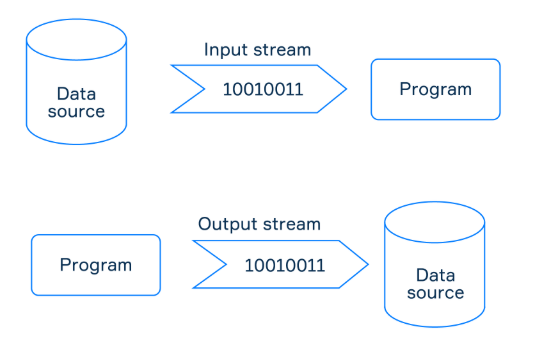
Java의 IO stream으로는 대표적으로 두가지가 있다.하나는 System.in, 다른 하나는 System.out 이다.
Output Stream
output stream은 특정 영역 (destination)에 데이터를 작성하게 해준다. 콘솔, 혹은 파일, 웹 소켓, 메모리 버퍼 등이 destination이 될 수 있다. 일반적으로 destination은 그냥 output stream이 도달하는 endpoint를 의미한다.
자바는 output stream을 다루는 class를 제공한다.
Char Stream
Writer Class 를 사용하여 작성한다.
try (CharArrayWriter contactWriter = new CharArrayWriter();
     FileWriter bc1 = new FileWriter("business_card_1.txt", true);
     FileWriter bc2 = new FileWriter("business_card_2.txt", true)) {

    contactWriter.write("Phone: 111-222-333; Address: Hyperskill Avenue, 7");
    contactWriter.writeTo(bc1);
    contactWriter.writeTo(bc2);

    char[] array = contactWriter.toCharArray(); // writer content as char[]
} catch (Exception e) {
    System.out.println("Something went wrong");
}
string과 char, char array를 작성하는데 사용한다.
Byte Stream
OutputStream Class를 사용하여 작성한다.
byte[] data = new byte[] {'s', 't', 'r', 'e', 'a', 'm'};
try (OutputStream outputStream = new FileOutputStream("sample.txt", false)) {
    outputStream.write(data);
} catch(IOException e) {
    System.out.println("Something went wrong");
}
stream writer를 사용할 땐 항상 try - catch 구문을 안에 넣는다.
Input Stream
Standard input, file, network connection, buffer 모두 input stream 의 source 이다. source는 프로그램에 의해 process 될 수 있는 모든 data를 의미한다.
Scanner 를 통해 standard Input을 통해 text를 읽을 수 있었듯, Reader Class들을 통해 File, console 등의 source로부터 입력을 받을 수 있다.
입력은 try catch 로 받아야 resource leaking 을 방지하기 편하다.
Char Stream
FileReader reader = new FileReader("file.txt");

char first = (char) reader.read(); // i
char second = (char) reader.read(); // n

char[] others = new char[12];
int number = reader.read(others); // 10

reader.close();
FileReader 클래스를 통해 문자열 단위로 스트림을 처리한다.
Byte Stream
byte[] bytes = new byte[5];
FileInputStream inputStream = new FileInputStream("file.txt");
int numberOfBytes = inputStream.read(bytes);
System.out.println(numberOfBytes); // 5
inputStream.close();
FileInputStream 클래스를 통해 바이트 단위로 스트림을 처리한다.
자연스럽게 text를 읽을거면 FileReader를 쓰면 되고, blob 파일같은걸 받을거면 FileInputStream을 받으면 되겠다.
JVM (Java Virtual Machine)
JVM은 physical computer 시뮬레이터이다. Java 자바 바이트코드 클래스 파일을 실행한다.
Java 파일을 컴파일하여 얻은 클래스 코드를 JVM에서 실행시킨다.
JVM은 다양한 하드웨어와 소프트웨어 플랫폼에서 동작하기 때문에 Java 바이트코드로 컴파일된 프로그램은 Platform-Independent 하다.
JRE (Java Runtime Environment)
JRE는 컴파일된 바이트코드를 실행하는 실행환경이다. JVM과 JCL (Java Class Library) 으로 구성되어 있다.
Standard Library들은 모두 class 파일이 패키징된 JAR File 형태로 저장되어있다.
JRE에서 컴파일된 프로그램을 돌린다는 건, 내가 짠 프로그램 뿐만 아니라 JCL 바이트코드를 이용해서 프로그램을 수행하는 의미가 되겠다.
JDK (Java Development Kit)
JVM, JRE 및 Java Compiler와 다른 툴들을 모두 포함하여 Java Development Kit 라고 한다.
Java Compiler는 .java 파일을 .class 파일로 컴파일한다.
Kotlin이나 Scala는 개별 컴파일러가 존재하지만, JDK로 번들되어있지 않다.

Exception
- 런타임에 발생하는 프로그램의 에러를 Exception 이라고 한다.
- 다양한 종류의 Exception 이 있다.
ArithmeticException
- 나눗셈을 할때 0으로 나눈다던지 (DivisionByZero) 연산을 할때 발생하는 Exception
NumberFormatException
- string을 integer로 parseInt 할 때 잘못된 format일 때 발생하는 오류
Hierarchy of exception
자바는 객체지향 언어이기 때문에 모든 Exception도 객체로 분류되며 클래스 계층에 따라 조직되어있다.
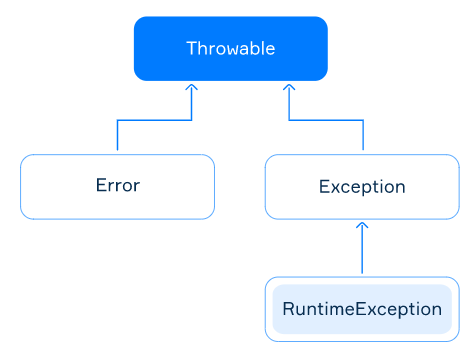
Throwable이 기본적으로 제공하는 메소드
- getMessage() -> exception message를 string으로 반환
- getCause() -> exception의 이유를 반환
- printStackTrace() -> 에러 스트림으로 stack trace를 출력
Throwable은 Error, Exception으로 subclass 가 구성되는데,
Error 는 JVM에서 등장하는 low-level exception들을 주로 표현하고 (OutOfMemoryError, StackOverflowError)
Exception 은 어플리케이션 내에서 발생하는 exception에 대해 다룬다. (RuntimeError, IOException)
RuntimeException class는 Exception의 Subclass 이며, unchecked exception들을 주료 표현한다.
실제 개발 프로세스에서 핸들링하는건 Exception class이다.
Checked and Unchecked Exception
Checked Exception
- RuntimeException 의 subclass가 아닌 Exception class를 Checked exception이라고 한다.
- 위 Exception에 한해 컴파일러가 해당 프로그램에서 예상되는 에러를 명시했는지를 체크한다.
- 특정 메소드가 Exception 던질 것으로 예상되는 경우, 메소드 뒤에 throws 키워드를 통해 해당 메소드가 던진 Exception을 명시한다. 명시하지 않는 경우 컴파일 되지 않을 것.
public static String readLineFromStdIn() throws IOException {
    BufferedReader reader = new BufferedReader(new InputStreamReader(System.in));
    String line = reader.readLine(); // it may throw the IOException
    return line;
}
위 코드에선 reader.readLine() 에서 IOException이 발생 할 것을 예상하여 이와 같이 작성이 되었다.
Unchecked Exception
- RuntimeException과 그 subclass들을 모두 Unchecked Exception 이라고 한다.
- 예외를 던지지 않아도 상관 없다.
실제로 어떻게 예외처리를 하는것이 바람직한지 에 대한 것은 따로 정리를 해야겠다.
Exception Handling
예외 처리는 try, catch 문으로 수행할 수 있다. Exception이 발생할 것 같은 코드를 try 블록으로 감싼다.
System.out.println("before the try-catch block"); // it will be printed

try {
    System.out.println("inside the try block before an exception"); // it will be printed

    System.out.println(2 / 0); // it throws ArithmeticException

    System.out.println("inside the try block after the exception"); // it won't be printed
} catch (Exception e) {
    System.out.println("Division by zero!"); // it will be printed
}

System.out.println("after the try-catch block"); // it will be printed
exception 자체에 대한 정보를 확인하려면, catch의 인자로 전달된 Exception e의 getMessage 메소드를 사용한다.
try 블록 내에 여러 종류의 Exception이 존재하는 경우 연속적으로 서로 다른 catch문을 적용할 수 있다.
물론 두 에러가 중첩되는 경우 가장 먼저 선언한 catch 문에 걸린다.
Throwing Exceptions
throw 할 수 있는 대상은 Throwable과 그 subclass 들로 제한된다.
특정 메소드에서 직접 Exception을 던질 수 있다.
import java.io.IOException;

public class Main {

    public static void method() throws IOException {
        throw new IOException(); // Exception을 던짐
    }

    public static void main(String args[]) {
        try {
            method();
        } catch (Exception e) {
            System.out.println(e.getClass());
        }
    }
}
Null Point Exception
런타임에서 Null Pointer Exception을 방지하려면, 최대한 null check 혹은 assert를 해주고,
NPE-Safe한 라이브러리를 사용하는 것이 좋다.
Try With Resource
input stream은 사용된 후에 바로 close 되어야 한다.
input stream이 생성될 때, JVM은 OS에게 file에 접근한다고 notify 하는데, 이때 JVM이 OS에게 permission을 받게 되고, file-descriptor를 받게 된다. 문제는, file-descriptor 는 갯수 제한이 있기 때문에, 썼으면 바로바로 반환을 해주어야 한다.
close를 하게 되면 stream과 관련된 모든 system resource를 반환하게 된다.
try {
    Reader reader = new FileReader("file.txt");
    // code which may throw an exception
} finally {
    reader.close();
}
파일 Reader를 선언한 후
다만 reader.close()에서도 오류가 발생할 수 있다는 단점이 있다. (nullPointer Exception 같은..)
물론 거기에도 또 try catch를 감싸줄 수 있지만, 그런 놀라운 일을.. 하고싶지는 않을 것이다.
이럴 때 try-with-resource 문법을 사용한다. Java 7부터 이를 지원한다.
try (Reader reader1 = new FileReader("file1.txt");
     Reader reader2 = new FileReader("file2.txt")) {
    // some code
}
try의 괄호 안에 reader를 선언하면, 괄호 안에 선언된 모든 reader가 적절하게 종료되는 걸 보장한다.
명시적으로 close를 작성해주지 않아도 리소스 반환을 guarantee 해준다.
Java 9부터는 반환해야 하는 FileReader를 명시하는 문법을 사용할 수 있다.
Reader reader = new FileReader("file.txt");
try (reader) {
    // some code
}
꼭 Reader 대상으로만 되는게 아니라, close 라는 메소드가 존재하는 모든 클래스에 대해서 괄호 안에 그 대상을 지정하면, try catch 영역이 끝나고 나서 close 해준다.
Annotation, Overriding
Annotation - 프로그램에 제공하는 메타데이터
@ 를 통해 annotation을 제공한다.
Built in annotations
@Depricated -> 해당 element (class, method, field...) 가 depricated 되었고 더이상 쓰면 안됨을 의미. 이게 사용되면 컴파일 Warning을 발생시킨다.
@SuppressWarnings -> 컴파일시가의 Warning을 disable 한다. Class, method, field, local variable에 사용할 수 있다.
@Override -> Superclass Method를 Override할 때 사용. method에만 사용할 수 있다.
Annotation Elements
annotation의 input으로 특정 element가 필요한 경우가 있다.
@SuppressWarnings(value = "unused")
public static void method() {
    int a = 0;
}
특정 변수가 사용되지 않은 경우 컴파일러에서 unused warning을 보이는데, 이때 SupressWarning의 인자로 unused를 넣으면, unused warning이 출력되지 않게 된다.
unused와 같이 특정 warning 상황을 인자로 넣어주면 해당 케이스의 warning을 출력하지 않을 수 있다.
Overriding
SuperClass의 메소드를 SubClass에서 새로 구현하는 것을 Overriding이라고 한다. 자바에서 overriding하는 규칙이 있다.
- 메소드 명과 argument가 동일해야 한다.
- return type이 동일하거나, 하위 클래스의 리턴 타입이 상위 클래스 리턴의 subtype (covarient type) 이어야 한다.
- access level은 SuperClass의 메소드가 SubClass의 메소드보다 더 열려있어야 한다.
- private method는 상속이 안되므로 Override 할 수 없다.
- superclass와 subclass가 같은 패키지에 있으면, package-private method는 override 할 수 있다.
- static method는 override가 안된다.
Access Modifier
private : 자기 자신만 쓸 수 있음
default (package-private) : 같은 패키지 내 클래스만 쓸 수 있음
protected : 같은 패키지와 extending class 에서 쓸 수 있음
public : 어디서든 사용할 수 있음

언제 Modifier를 적용할지에 대해서는 다음과 같다.
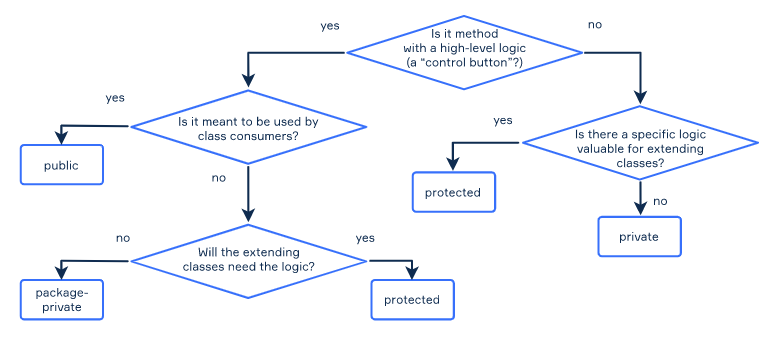
추상화된 로직을 담으며, class consumer가 사용할 것은 public
추상화되었지만, consumer는 쓰지 않고, extending class가 해당 로직이 필요하지 않으면 package-private
extending class가 해당 로직이 필요하면 protected,
추상화된것도 아니고, 자기 자신만 쓰는거면 private
Polymorphism
- Ad-hoc polymorphism : 함수가 다른 입력에 대해 다르게 수행하는 것, Method Overloading 을 의미
- Subtype polymorphism : base class를 쓸 수 있을 때, 그 대신 subclass 인스턴스를 사용하는 것
- Parametric polymorphism : 임의의 인자 타입에 대해 동작하는 함수를 나타내는 것.
Compile time에 상위 타입으로 명시가 되었어도, 런타임에는 Actual type의 instance가 존재하게 되므로 메소드가 그대로 실행된다.
Reference
- https://hyperskill.org/learn/step/3497
- https://hyperskill.org/learn/step/3570
- https://hyperskill.org/learn/step/3552
- https://hyperskill.org/learn/step/3553
- https://hyperskill.org/learn/step/1945
- https://hyperskill.org/learn/step/1940
- https://hyperskill.org/learn/step/9734
- https://hyperskill.org/learn/step/3499
- https://hyperskill.org/learn/step/5533
- https://hyperskill.org/learn/step/8837
- https://hyperskill.org/learn/step/9723
- https://hyperskill.org/learn/step/3510
'Java > Basic' 카테고리의 다른 글
| [3] Intellij 에서 기본 maven 프로젝트 시작하기 (0) | 2020.11.24 |
|---|---|
| [2] Java Spring Boot Project - Intellij 에서 실행시키기 (2) | 2020.09.25 |


댓글